

How To Add Person To New Background Beginners
Visio lets yous transform complicated text and tables that are difficult to understand into visual diagrams that communicate information at a glance. There are many kinds of Visio diagrams, including organization charts, network diagrams, workflows, and home or office plans. Getting started with Visio can be summarized into three basic steps: using a template, arranging and connecting shapes, and modifying shapes with text.
Annotation:If you accept Visio Plan 2, you have access to both the installed app and the spider web version of Visio. With Visio Programme ane, you lot become just the web version of Visio. Not certain which license yous take? Yous can check what version you have.
Notation:See Install Visio if yous haven't installed the Visio app all the same.
Tutorial: iii basic steps to create a Visio diagram:
-
Choose and open a template
-
Arrange and connect shapes
-
Add text to shapes and connectors
Choose and open a template
Templates include stencils, shapes, and grid measurements to aid you lot get started rapidly and hands when making your diagram.
-
Templates come up with stencils that are full of the shapes needed to create a particular kind of drawing.
The Home Plan template, for example, opens with stencils full of shapes such as walls, piece of furniture, appliances, cabinets, and so on.
The Organization Chart template includes distinct shapes for executives, managers, assistants, positions, consultants, vacancies, and more.
-
Appropriate grid size and ruler measurements
Some drawings require a special calibration. For example, the Site Program template opens with an applied science calibration, where 1 inch represents x feet. Templates come ready with appropriate settings for the drawing type.
-
Special tabs
Some templates have unique features that you tin detect on special tabs in the ribbon. For instance, when you open up the Office Layout template, a Plan tab appears. You can use the Plan tab to configure display options that are specific to role layout diagrams.
-
Wizards to help you with special types of drawings
In some cases when you open up a Visio template, a wizard helps yous go started. For case, the Infinite Plan template opens with a wizard that helps you set upwardly your space and room data.
-
Start the Visio app or open Visio on the web. If Visio is already open, select File > New.
-
Select the template you want, or select Bones Diagram to start from scratch.
You lot can also browse for more templates by clicking Categories, and you lot tin can enter terms to search for templates.

-
If yous're using the desktop link, you may have to specify a specific type of that template and then select Create.
Conform and connect shapes
To create your diagram, you drag shapes from the stencil in the Shapes window to the canvass and connect them. There are several means to connect shapes, merely the simplest mode is with AutoConnect arrows.
Note:AutoConnect is available by default when your cartoon is based on a template for a type that typically requires connections, like a flowchart. If do not see the AutoConnect arrows  when yous hover the mouse pointer over a shape, AutoConnect is not active. To activate AutoConnect, click Connector in the Tools area on the Abode tab.
Visio shapes are prepare-made objects that you elevate onto your drawing page — they are the building blocks of your diagram.
When you lot elevate a shape from the Shapes window onto your drawing page, the original shape remains on the stencil. That original is chosen a master shape. The shape that you put on your drawing is a copy — besides called an instance — of that master. You can drag equally many instances of the same shape onto your drawing as y'all want.
Instead of static pictures, you tin create data-connected Visio diagrams that display data, are easy to refresh, and dramatically increase your productivity. You can use the broad variety of diagram templates and stencils in Visio to understand, human action on, and share information about organizational systems, resources, and processes throughout your enterprise.
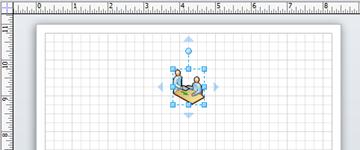
Rotating and resizing shapes
-
Rotation handles
The round handle
 located above a selected shape is called a rotation handle. Elevate it right or left to rotate the shape.
 -
Connection arrows for AutoConnect
The connectedness arrows
help y'all easily connect shapes to ane some other, as yous saw in the previous section. -
Selection handles for resizing shapes
You can utilise the square selection handles to change the height and width of your shape. Click and drag a option handle on the corner of a shape to enlarge the shape without changing its proportions, or click and elevate a pick handle on the side of a shape to make the shape taller or wider.
Visio shapes can concur data
You can add data to each shape by typing it in the Shape Data window – on the View tab, in the Prove group, click Task Panes, and then click Shape Data. With Visio Professional person Edition, you can likewise import data from an external data source.
Data is not displayed in the cartoon past default. To meet the information for an individual shape, open up the Shape Data window at Data > Bear witness/Hide > Shape Data Window, and so select the shape.
If you want to brandish the data for lots of shapes at once, you can apply a feature chosen data graphics, also on the Data tab. The post-obit analogy shows the information for ii trees at in one case.
Visio shapes with special behavior
Many Visio shapes have special behavior that you lot can find by stretching, right-clicking, or moving the yellow control handle on the shape.
For example, y'all tin can stretch a People shape to bear witness more people, or stretch the Growing blossom shape to indicate growth.
Tip:A great style to detect out what a shape can practice is to right-click information technology to see if there are any special commands on its shortcut menu.
If yous're building an organization chart, shapes can automatically build the reporting construction. Drag each person's shape to the chart and drop it on top of their managing director'due south shape. The shapes automatically connect to show the hierarchy.
-
In the Shapes window, select a shape and drag it onto the canvass.
-
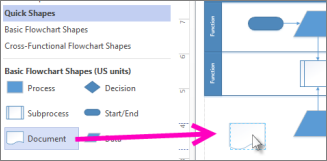
Hold your mouse over 1 of the arrows and a mini toolbar appears with the top four shapes in the Quick Shapes surface area.
Select the shape you want and it'll automatically connect to the arrow yous selected. -
You lot tin can likewise drag all your shapes onto the canvass. Then hold the mouse over a shape until the arrows appear. So grab an arrow and elevate it to a shape you want to connect to.

-
If you're using the Visio desktop app, you tin can besides drag a new shape directly from the Shapes window to an existing shape's arrows and connect them automatically.
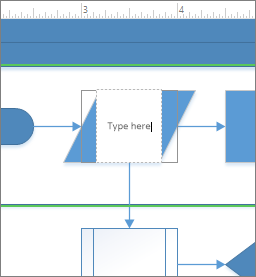
Add together text to shapes and connectors
At present it's time to add together details to your diagram by adding text. For more details about working with text, come across Add, edit, motion, or rotate text on shapes and Add together text to a page.
-
Select a shape.
-
Blazon your text. When you start typing, Visio switches the selected shape to text editing mode.
-
Click an empty surface area of the page, or press Esc when you're finished.
Note:To motion text on a shape, go to Dwelling house > Tools > Text Block
 , and become to a shape that has text on it. Drag the text effectually and then go back and click Dwelling > Tools > Arrow Tool
 when you're done.
Add text to a connector the aforementioned way. After y'all press ESC or click abroad, select the connector once again and you lot'll see a tiny box on the text – this is a handle for moving the text block. Click and drag it up, down, or beside the connector.
Customize your Visio diagram
Once you've created your Visio diagram, in that location'south more yous can do to make information technology your own:
-
On the Pattern tab, hover the mouse pointer over the diverse themes.
Visio temporarily applies each theme every bit you hover the mouse arrow over them.

-
To see other available themes, click More than
 .
. -
Click the theme that yous want to apply to the diagram.
-
Click Pattern and so click Backgrounds.
-
Click a background.
Your diagram gets a new background, and, a new background page chosen VBackground-ane. This page you can see in the page tabs along the bottom of the sheet.
-
Click Design > Borders & Titles and click the title manner that y'all want.
-
Click a title style.
The championship and border appear on the background page.
-
At the bottom of the diagramming area, click the VBackground-1 tab.
-
Click the title text.
The unabridged border is selected, only when you get-go typing information technology changes the title text.
-
Type your championship, then press ESC.
-
To edit other text in the edge, starting time select the entire border, and so click the text you want to alter and first typing. You may have to click more than once to get the text selected.
-
Click Page-1 in the lower-right corner of the folio to return to the drawing.
Tutorial: iii bones steps to create a Visio diagram:
-
Choose and open up a template
-
Conform and connect shapes
-
Add text to shapes and connectors
Choose and open up a template
Templates include stencils, shapes, and grid measurements to help yous go started quickly and easily when making your diagram.
-
Templates come with stencils that are full of the shapes needed to create a item kind of cartoon.
The Home Program template, for example, opens with stencils full of shapes such equally walls, furniture, appliances, cabinets, and so on.
The Organization Nautical chart template includes distinct shapes for executives, managers, assistants, positions, consultants, vacancies, and more than.
-
Advisable grid size and ruler measurements
Some drawings require a special scale. For example, the Site Program template opens with an engineering scale, where ane inch represents ten feet. Templates come up ready with appropriate settings for the drawing type.
-
Special tabs
Some templates take unique features that you lot can find on special tabs in the ribbon. For example, when you open the Office Layout template, a Plan tab appears. Yous tin apply the Plan tab to configure brandish options that are specific to office layout diagrams.
-
Wizards to help you with special types of drawings
In some cases when you open a Visio template, a wizard helps you go started. For case, the Space Plan template opens with a wizard that helps you prepare your infinite and room information.
-
Open Visio on the spider web. If Visio is already open up, select File > New.
-
Select Create under the template you want, or select Create nether Basic Diagram to start from scratch.
Arrange and connect shapes
To create your diagram, you drag shapes from the stencil in the Shapes pane to the canvas and connect them. At that place are several ways to connect shapes, but the simplest fashion is by car-connecting them.
-
In the Shapes window, select a shape and drag it onto the canvas.
-
Hold your mouse over one of the arrows and a mini toolbar appears with the tiptop four shapes in the Quick Shapes surface area.
Select the shape y'all want and information technology'll automatically connect to the arrow you selected. -
You can also drag all your shapes onto the canvas. Then hold the mouse over a shape until the arrows appear. So take hold of an arrow and elevate information technology to a shape you desire to connect to.
-
If you're using the Visio desktop app, yous can also elevate a new shape direct from the Shapes window to an existing shape's arrows and connect them automatically.
Add text to shapes and connectors
Now it's time to add details to your diagram by calculation text. For more than details about working with text, see Add and format text in Visio for the spider web.
-
Select a shape.
-
Type your text. When you get-go typing, Visio switches the selected shape to text editing mode.
-
Click an empty area of the page, or printing Esc when you're finished.
Note:To movement text on a shape, go to Home > Tools > Text Block
, and go to a shape that has text on information technology. Drag the text effectually then go dorsum and click Home > Tools > Pointer Tool
Add text to a connector the same way. Later you printing ESC or click abroad, select the connector again and you'll come across a tiny box on the text – this is a handle for moving the text block. Click and drag it up, down, or abreast the connector.
Customize your Visio diagram
One time you've created your Visio diagram, in that location'southward more you can do to make it your own:
-
On the Design tab, hover the mouse pointer over the various themes.
Visio temporarily applies each theme as you hover the mouse pointer over them.
-
To run into other bachelor themes, click More.
-
Click the theme that y'all want to apply to the diagram.
-
Click Design and then click Backgrounds.
-
Click a background.
Your diagram gets a new background, and, a new background page called VBackground-1. This page you can see in the page tabs forth the bottom of the sail.
-
Click Design > Borders & Titles and click the title style that you want.
-
Click a title style.
The championship and border announced on the background folio.
-
At the bottom of the diagramming area, click the VBackground-1 tab.
-
Click the title text.
The entire edge is selected, but when y'all start typing it changes the championship text.
-
Type your championship, then press ESC.
-
To edit other text in the edge, first select the entire border, and so click the text you want to change and start typing. You may take to click more than once to become the text selected.
-
Click Folio-1 in the lower-right corner of the page to render to the drawing.
Create a simple diagram
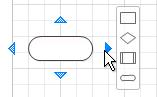
Elevate a shape from the Shapes window and drop it on the page. Exit the mouse pointer over the shape until four arrows appear around the sides. These are AutoConnect arrows, which requite you several ways to automatically connect shapes.
-
Concur the mouse arrow over ane of the arrows and a mini toolbar appears, holding the superlative four shapes in the Quick Shapes expanse.
Movement the pointer over each to see a preview of that shape on your diagram. Click the 1 that you want, and that shape appears with a connector between it and your first shape. -
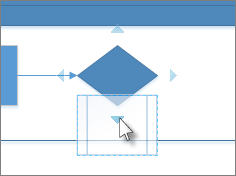
Drag a shape from the Shapes window and hold it over a shape on the page until the arrows appear, then drop the shape on top of one of the arrows.
-
Concur the pointer over a shape until the arrows appear, then grab an pointer, drag it to a shape you lot want to connect to, and drop it in the middle of the second shape.
Note:Some templates accept other handy means to add and connect shapes. For example, the organization nautical chart template lets you lot drop subordinates' shapes on pinnacle of a director's shape, automatically forming that director's reporting structure.
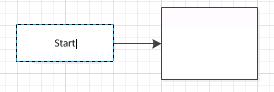
Add text to the shapes
Click a shape once and start typing. Press ESC or click an empty area of the page when you're washed typing.
Add text to a connector the same way. Afterward you press ESC or click away, select the connector again and yous'll run across a tiny box on the text – this is a handle for moving the text block. Click and drag it up, downward, or beside the connector.
Motion text on a shape
Click Home > Tools > Text Block , go to a shape that has text on information technology, and elevate the text effectually. Become back and click Home > Tools > Pointer Tool
Alter the font, size, and other formatting
Select a shape that has text. Click Home and use tools in the Font and Paragraph groups to format the text.
Make the diagram look ameliorate
Once you lot've created your Visio diagram, at that place's more you tin do to change its wait:
Add colour and other formatting
On the Design tab, in the Themes group, move the pointer slowly over the dissimilar themes. Each theme adds different colors and effects to the diagram. Click the one you lot want to apply.
Add a background to a Visio diagram
Click Design > Backgrounds > Backgrounds. Click one of the background designs.
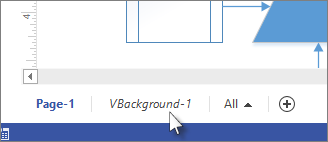
Now look downwardly at the bottom of Visio, merely under the drawing page. At that place are 2 tabs: Page-1 and VBackground-ane. Page-1 is the page with the shapes on it, and VBackground-ane is a background page you simply added. Click VBackground-i to come across merely the background page, and then click Page-1 to go back to the diagram.
Apply a border or title to a Visio diagram
Click Design > Backgrounds > Borders & Titles. Click one of the options to add it to the diagram.
Notice the edge and title are added to the background page, so if you want to add the title, click the tab for the groundwork page. At present click Championship once and first typing. The title changes to your new text. When you're washed, click the Page-ane tab to go back to your diagram.
Find and apply a template
Visio 2010 allows you to apply built-in templates, to employ your own custom templates, and to search from a diversity of templates available on Role.com. Role.com provides a wide selection of popular Excel templates.
To notice and apply a template in Visio, practise the post-obit:
-
On the File tab, click New.
-
Under Choose a Template, practice i of the following:
-
To utilise ane of the built-in templates, under Template Categories, click the category that you want, and then click the template that you want and click Create.
-
To reuse a template that you've recently used, under Recently Used Templates, click the template that you want and then click Create.
-
To utilize your own template that y'all previously created, under Other Ways to Go Started, click New from existing, navigate to the file that you want and click Create New.
-
To find a template on Office.com, nether Other Means to Get Started, click Office.com templates, select the template that you want, and so click Download to download the template from Office.com to your computer.
-
Notation:You can also search for templates on Function.com from within Visio. To search for templates on Part.com, nether Other Means to Get Started, click Office.com templates. In the Search Office.com for templates box, type 1 or more search terms, and so click the arrow button to search.
Create a new diagram
-
Click the File tab. This opens upwardly the Backstage view.
Note:Yous are in the Backstage view when you lot get-go open Visio. If you accept just opened Visio, continue to the adjacent stride.
-
Click New.
-
Under Choose a Template, below Other Means to Get Started, click Blank cartoon.
-
Click Create.
When the diagram template opens, most of the space is taken up with a blank diagramming page. Along the side is the Shapes window, which contains several stencils full of shapes.
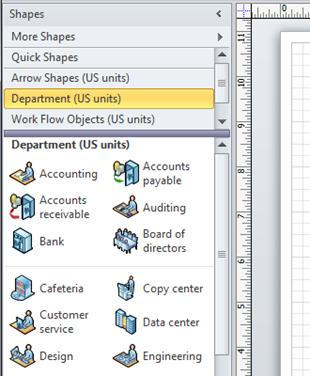
The stencils are identified by title bars at the top of the Shapes window; you might need to ringlet the title bar pane to see them all. When you lot click a stencil title bar, the shapes appear in the pane below.
Open a diagram
-
Click the File tab, and and then click Open.
-
In the left pane of the Open dialog box, click the drive or folder that contains the drawing.
-
In the right pane of the Open dialog box, open the folder that contains the drawing that you want.
-
Click the drawing and and then click Open.
Salve a diagram
You can save your diagram every bit a standard Visio file that you can share with other people who have Visio. In addition, there are many dissimilar formats that you tin salvage your diagram in directly from the Salve Every bit dialog box.
-
Click the File tab.
-
Click Salvage Every bit, and so select a format in the Save as blazon list.
The different formats are useful for dissimilar ways of using or sharing your diagram.
-
Standard image file including JPG, PNG, and BMP formats.
-
Web folio in HTM format. Prototype files and other resource files are saved in a subfolder of the location where you save the HTM file.
-
PDF or XPS file
-
AutoCAD drawing in DWG or DXF format.
Add together a shape
-
From the Shapes window, click and hold the shape that you desire.
-
Drag the shape onto the diagram page.
For more than data about how to add shapes, see Use the Shapes window to organize and find shapes and Find more shapes and stencils.
Add together a connector betwixt two shapes
To add a shape to the cartoon page so that it is automatically continued when it is added to the folio, do the following:
-
Elevate a starting time shape onto the cartoon page.
-
Hold your arrow over the shape that is already on the page. Notice that small bluish arrows appear on the four sides of the shape. These are AutoConnect arrows that yous tin employ to connect shapes.
The Service Asking shape with the AutoConnect arrows shown.
-
Move the pointer to comprehend one of the arrows.
A mini toolbar that contains 4 shapes appears, and a preview shape might also appear on the folio. Equally you move the pointer over the shapes in the mini toolbar, previews of the shapes appear. The shapes on the toolbar are the top four shapes from the Quick Shapes area.
-
Click one of the shapes in the mini toolbar to add information technology to the page.
To automatically connect two shapes when you lot drag the second shape onto the page, do the post-obit:
-
Drag one shape onto the drawing folio.
-
Drag a second shape onto the drawing folio and agree it and so it covers the commencement shape, simply do not drop it yet. Notice that the AutoConnect arrows announced.

The Analyze shape is placed on the bottom AutoConnect arrow on the Service Asking shape.
-
Motion the 2nd shape down over the AutoConnect pointer that points in the management that you want, and driblet it on the arrow.

The Analyze shape is spaced a standard distance from the Service Request shape, and is connected automatically.
To connect 2 shapes that are already on the page, practise the following:
-
Hold the pointer over one of the shapes that you lot want to connect.
-
When the AutoConnect arrows announced, move the pointer over an arrow that is pointing toward the other shape that you desire to connect to.
-
Click and concur the AutoConnect pointer, and so drag a connector from it to the center of the other shape.
When the pointer is over the middle of the other shape, a red border appears effectually the shape. Drib the connector to attach it, or "gum" it, to the shape.
For more than information about how to connect shapes, meet Add connectors between shapes in Visio.
Add text to shapes or to the page
Add text to a shape
-
Select the shape that yous want to add text to.
-
Type the text that you desire.
When yous showtime typing, Visio switches the selected shape to text editing mode. To add some other line of text, press ENTER.
-
Click an empty expanse of the folio, or press ESC when you are finished.
-
Select the shape again. A small yellow control handle appears in the text area. Drag the yellow command handle to move the text.
Add together text to the page
-
On the Dwelling tab, in the Tools group, click the Text tool.
-
Click an empty area of the folio. A text box appears.
-
Type the text that yous want.
-
On the Dwelling tab, in the Tools group, click Pointer Tool to cease using the Text tool.
The text box now has the characteristics of other shapes. You can select information technology and type to change the text, you can drag it to another part of the page, and yous can format the text by using the Font and Paragraph groups on the Habitation tab. In addition, when you lot hold the arrow over the text, AutoConnect arrows appear so you lot can connect the text to other shapes.
For more than data nigh how to add text blocks, see Add, edit, move, or rotate text and text blocks.
Add data to a shape
To enter data into a information property or field that a shape already has, do the following:
-
Select a shape on the drawing page.
-
Right-click the shape and click Shape Data.
-
In the Shape Data window, in the property row that you want, enter the data that you desire.
To define a new data holding or field for a shape, practise the following:
-
Select a shape on the drawing page.
-
Right-click the shape and click Define Shape Data.
-
In the Ascertain Shape Data dialog box, click New
-
In the Label box, delete the default text and type a name for the property.
-
In the Blazon list, select the blazon of data that you desire to exist entered into that property.
Tip:If you want the property to accept text (like a person's proper noun) every bit the type of data, select String.
-
In the Value box, blazon the value of the data that you lot desire.
-
Click OK.
-
Right-click the shape again, point to Information, and this time click Shape Data.
The Shape Data window opens and displays all the data that has been defined for the shape. If all of the shapes have specific information, you lot can leave the Shape Data window open and click the shapes you are interested in to see the data that they contain.
Connect data sources to shapes
Calculation shape data manually can add a lot of value to your diagram, but if your data is in a database or an Excel workbook, you lot can pull that data into your diagram automatically and connect the rows of data with specific shapes.
Use the Data Selector wizard to import your data into the External Data window.
The data that appears in the External Information window is a snapshot of your source data at the fourth dimension of import. You can update the data in your drawing to match the changes in your source information by clicking Refresh All on the Data tab.
-
On the Data tab, in the External Data group, click Link Information to Shapes.
-
On the first page of the Data Selector magician, choose which of the post-obit types of data sources accept the data you're using:
-
Microsoft Office Excel workbook
-
Microsoft Office Access database
-
Microsoft Windows SharePoint Services listing
-
Microsoft SQL Server database
-
Other OLEDB or ODBC information source
-
-
Complete the remainder of the wizard.
Later yous click Finish on the last page of the Data Connection wizard, the External Information window appears with your imported data shown in a filigree. Drag a row of data onto a shape to add automatically the data to the Shape Data for that shape. Or, in the Shapes window, select a shape that you want to hold the data, so drag a row of data and driblet it on an empty area of the page. The selected shape is added to the folio, connected to the data.
Format your diagram
To apply a background to your drawing:
-
Click the Design tab.
-
In the Backgrounds group, click Backgrounds.
-
Click the background that you want. A new background page is added to the diagram, which you tin run into in the page tabs forth the bottom of the diagramming area.
To apply a border or championship to your cartoon:
-
On the Design tab, click Borders & Titles.
-
Click the championship that you want.
The title and border are added to the background page (named VBackground-1 by default). To change the title and other text, you must make the changes on the groundwork page; you can't modify the title on whatsoever other pages.
-
At the bottom of the diagramming area, click the VBackground-one tab.

-
Click the championship text. The entire edge is selected, but if you commencement typing information technology changes the default title text.
-
Enter the championship that you desire.
-
To edit other text in the border, commencement select the entire border, and then click the text you desire to modify and first typing.
To apply a unified colour scheme and other formatting effects:
-
On the Design tab, in the Themes group, hold your pointer over the various themes. A preview of the theme shows up on the page.
To encounter other available themes, click More
. -
Click the theme yous want to apply to the diagram.

How To Add Person To New Background Beginners,
Source: https://support.microsoft.com/en-us/office/beginner-tutorial-for-visio-bc1605de-d9f3-4c3a-970c-19876386047c
Posted by: cannonbenty1991.blogspot.com
0 Response to "How To Add Person To New Background Beginners"
Post a Comment