

How To Do A Blur Background In Photoshop

Imagine this: Y'all capture an amazing portrait of the bride and the groom at a wedding. Y'all are excited virtually that one epic photograph yous tin't wait to share on your social media and website. So, when it's fourth dimension to finally view the picture on your figurer, something in the prototype's background distracts you instantly. Equally a wedding photographer, you already know that no affair how perfectly timed or focused your prototype, backgrounds tin can ofttimes ruin an otherwise perfect wedding photo. This is quite common when you are photographing in a crowd. However, whether information technology's a distracting chemical element or an unpleasant background in full general, a little bit of work on Photoshop could fix your photograph. To assist you lot make fifty-fifty your rejected pictures make information technology to the list of final deliverables, we offer you tips and tricks to blur groundwork in Photoshop in this weblog.
A 7-Footstep Guide to Mistiness Backgrounds in Photoshop
1. Choose Your Photograph
Open Adobe Photoshop CC on your computer. So click the File option on its menu bar. Click the Open button from the dropdown menu. Now cull a photo to edit from your gallery.
ii. Go to Mistiness Gallery

Once you have picked a photograph, click the Filter office on the menu bar. In the dropdown menu, find the Blur Gallery choice. Clicking on it will give you a list of various blur options. To blur the background of your photograph, we suggest you cull Iris Mistiness because it helps yous define a focal indicate in the image while blurring the rest of the picture.
iii. Apply Iris Blur

After you click on the Iris Blur pick, you volition see a large Blur Band announced on the paradigm with a Pin in the center of it. In that location will also be several dots around the band. The Pin inside the Blur Ring acts as a target. The epitome would remain sharp and clear at the center of the target only volition get more blurry as the distance from the centre increases. At present you can click the center of the pivot and drag it to your subject. Release your mouse to identify the pin.
4. Adjust the Blur Transition
Inside the Mistiness Band, you lot will come across four larger white dots. These dots define the blur transition expanse. The blur transition becomes smoother when yous motion the dots closer to the focal betoken and sharper when you movement the dots away from the focal bespeak. Yous can click and drag the white dots to adapt the size of the blur transition surface area.
5. Resize Your Blur Area

There are four small dots along the outer ring of the blur preview. When you motion your mouse over one of those dots, your cursor volition change to a curved arrow. Now rotate this double-ended arrow slightly clockwise by moving your mouse. Doing so will increase the blur expanse. If you move the pointer counter-clockwise, the blur area volition decrease. Another easy way of doing this is by clicking and dragging the Blur Ring line rather than the dots.
vi. Melody the Mistiness Amount
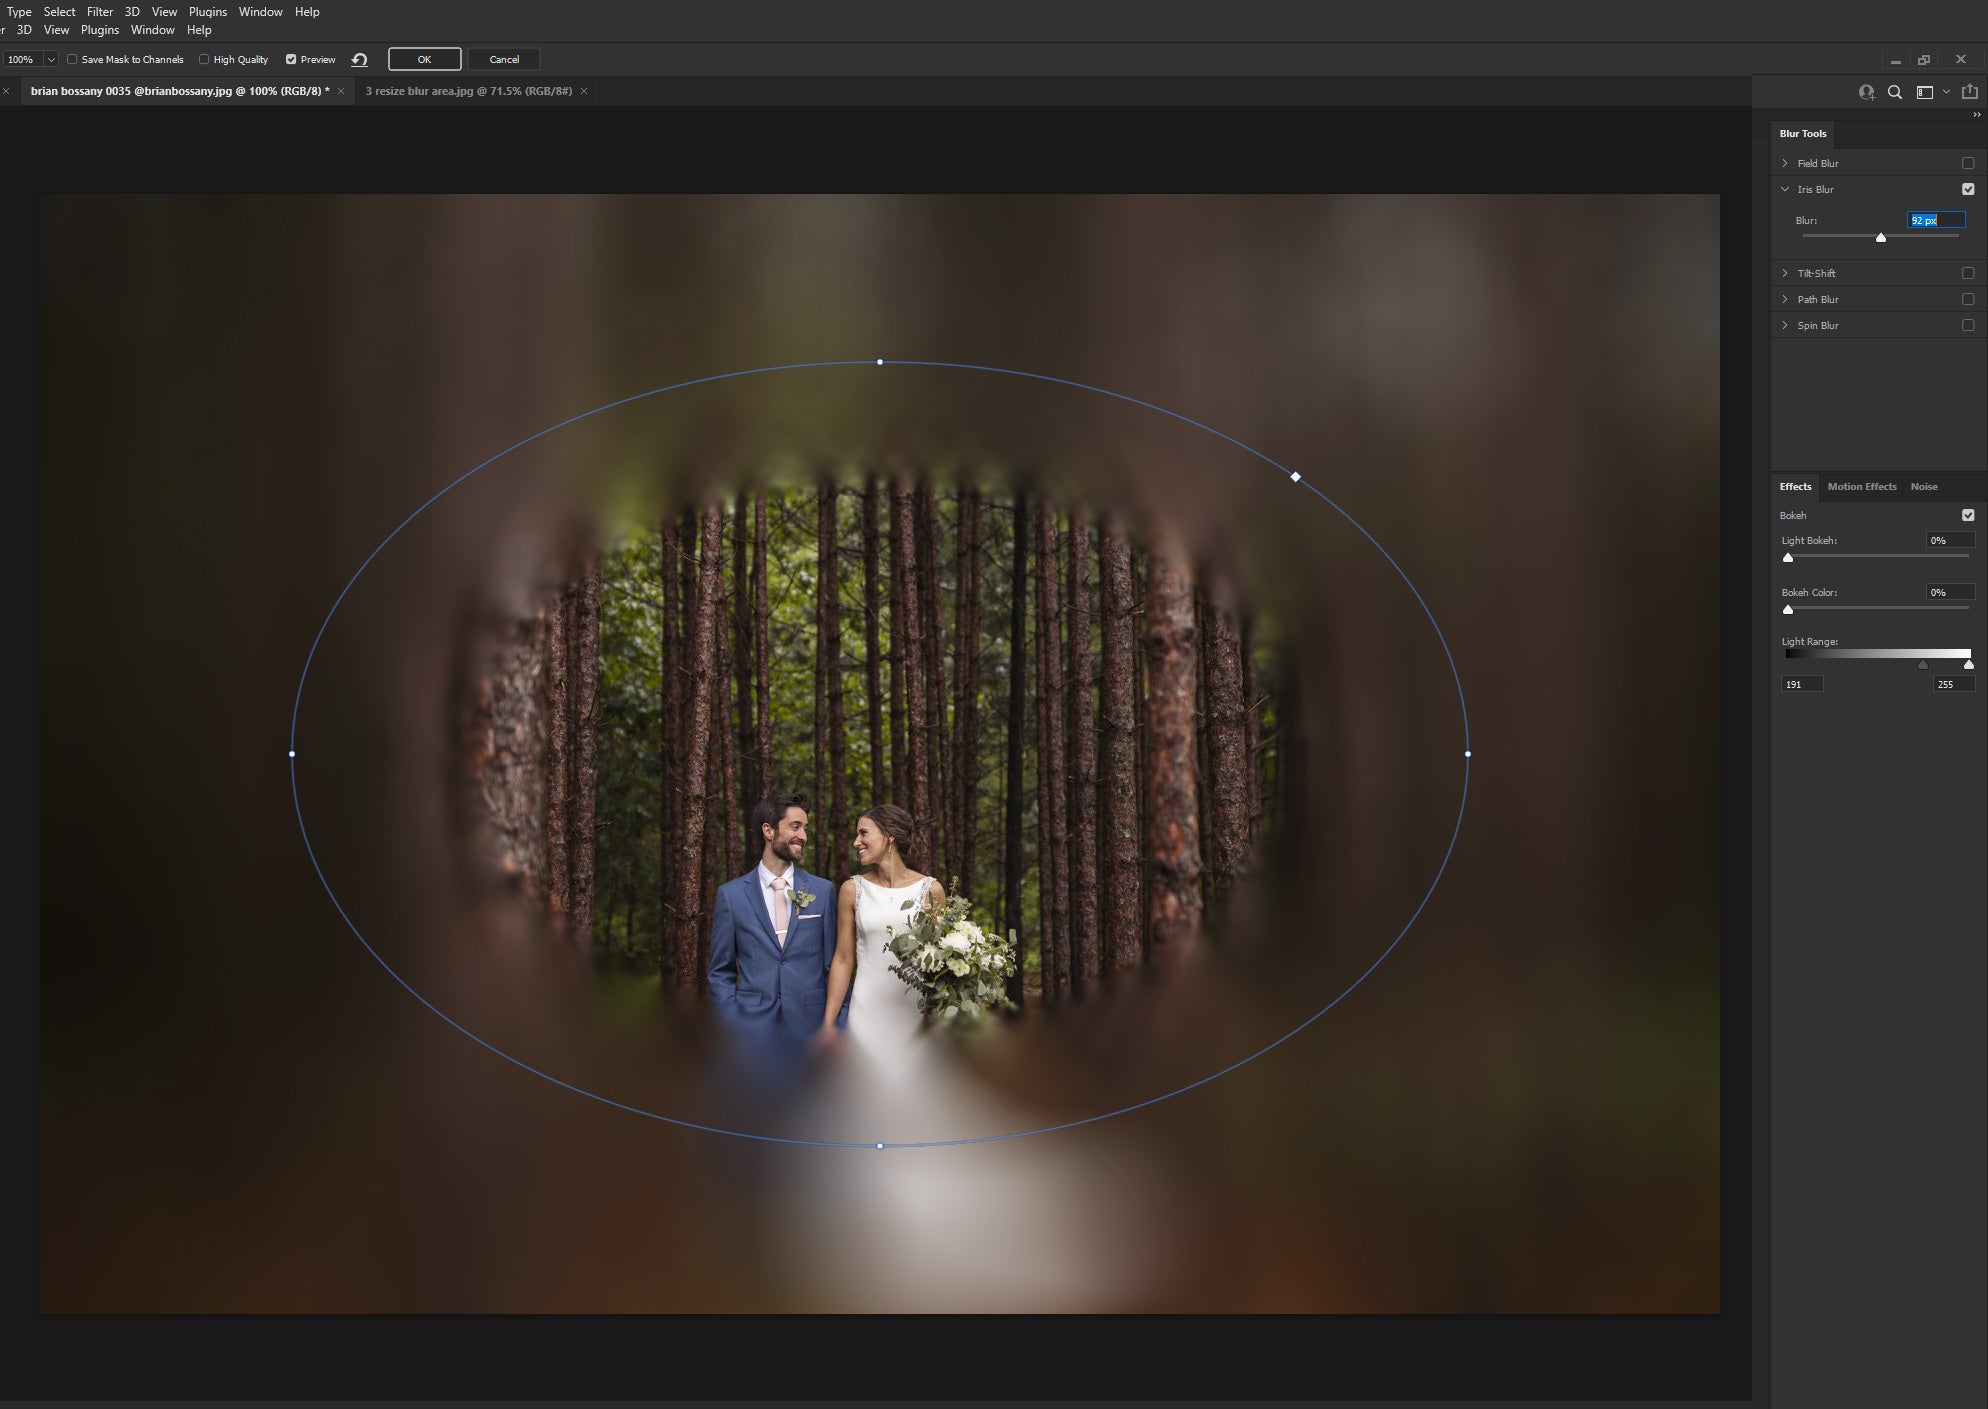
You tin can set the Blur Knob to adjust the blur amount. You will discover the knob in the centre of the Mistiness Preview around the Pin. Moving the Blur knob clockwise will enhance the blur, and rotating it counter-clockwise will decrease the blur. Y'all tin can too adjust the mistiness by using the Blur Slider in the Mistiness Tools console to the right of your screen.
7. Mistiness the Background of Your Photograph
You lot can proceed adjusting the Iris Mistiness by following the steps mentioned above. One time you are satisfied with your background, just go to the top of the Blur Gallery option. Printing the OK push, and your edits will be saved.
Further Read: How to Add, Modify, and Remove a Background in Photoshop
When you mistiness the groundwork of your images in Photoshop or give the background a picayune out-of-focus wait, it can help you increase the focus on your subject. It is also a highly sought-after await that tin can be a office of every wedding lensman'south skill set.
At ShootDotEdit, nosotros beloved sharing tips with hymeneals photographers and refer to Photoshop experts at Adobe to ensure our tips align with the pros. We also assist wedding ceremony photography businesses grow by providing photograph editing services. To learn more than about our services, check out our pricing plans.

How To Do A Blur Background In Photoshop,
Source: https://shootdotedit.com/blogs/news/how-to-blur-background-in-photoshop
Posted by: cannonbenty1991.blogspot.com
0 Response to "How To Do A Blur Background In Photoshop"
Post a Comment